The Problem: Why Most AI-Assisted Development Falls Short
Most developers using AI coding assistants jump straight to implementation — the “vibe coding” approach. You open a chat, describe a feature in a sentence or two, and let the model generate code. It works for small scripts and throwaway prototypes, but it breaks down the moment you try to ship something real.
The symptoms are predictable:
- Hallucinated architecture — the agent invents patterns that don’t match your codebase
- Missed requirements — no spec means no contract; the agent guesses what “done” means
- Undocumented API calls — generated code uses methods that don’t exist in the library version you’re on
- Manual testing loops — you eyeball the output, notice something wrong, re-prompt, repeat
Every one of these is a planning failure, not a model failure. The AI is doing exactly what you asked — you just didn’t ask for enough.
Here’s the workflow that addresses each failure mode.
What You Will Learn
This post walks through the complete 8-step workflow I use to ship features — from initial design to validated implementation. Each step exists because skipping it caused real problems.
- Start with a user flow before touching any code
- Design non-templated UI with Claude Code’s Frontend Design skill
- Set up parallel agent workspaces using SuperSet.sh and git worktrees
- Eliminate exploration overhead with Unoplat Code Confluence’s codebase intelligence
- Plan specs with OpenCode and manage tasks in Backlog.md
- Implement the spec with Claude Code
- Validate framework usage with a documentation sub-agent
- Run browser-based E2E testing against the original user flow
The Complete Workflow: 8 Steps from Idea to Validated Feature
Step 1 — User Flow First
Before writing a single line of code (or prompting an agent to), I design the user flow in Mermaid. This is the single highest-leverage step in the entire workflow.
A user flow forces you to answer questions that will make your PRD more clear both for humans, users as well as agents Example: What happens when the user clicks Cancel? What state does the page load in? Where does the error message appear? These aren’t edge cases — they’re the exact gaps that cause AI agents to hallucinate architecture.
The flow becomes the acceptance criteria for every downstream step. The design matches it. The spec references it. The browser agent tests against it.
Step 2 — Design with Claude Code
With the flow defined, I move to visual design. I use Claude Code (Opus 4.6) paired with the Frontend Design skill — a skill specifically built for generating distinctive, production-grade frontend interfaces based on design system i already have.
The key word here is non-templated. Default AI-generated UI tends to look identical across projects — the same card layouts, the same hero sections, the same color palettes. The Frontend Design skill pushes past that by generating creative, polished designs that avoid generic AI aesthetics.
This step outputs the actual component structure and styling that the implementation agent will work from.
Step 3 — SuperSet.sh + Git Worktrees
Now we need a workspace. This is where SuperSet.sh comes in — a terminal-based orchestration platform built specifically for running multiple AI coding agents in parallel.
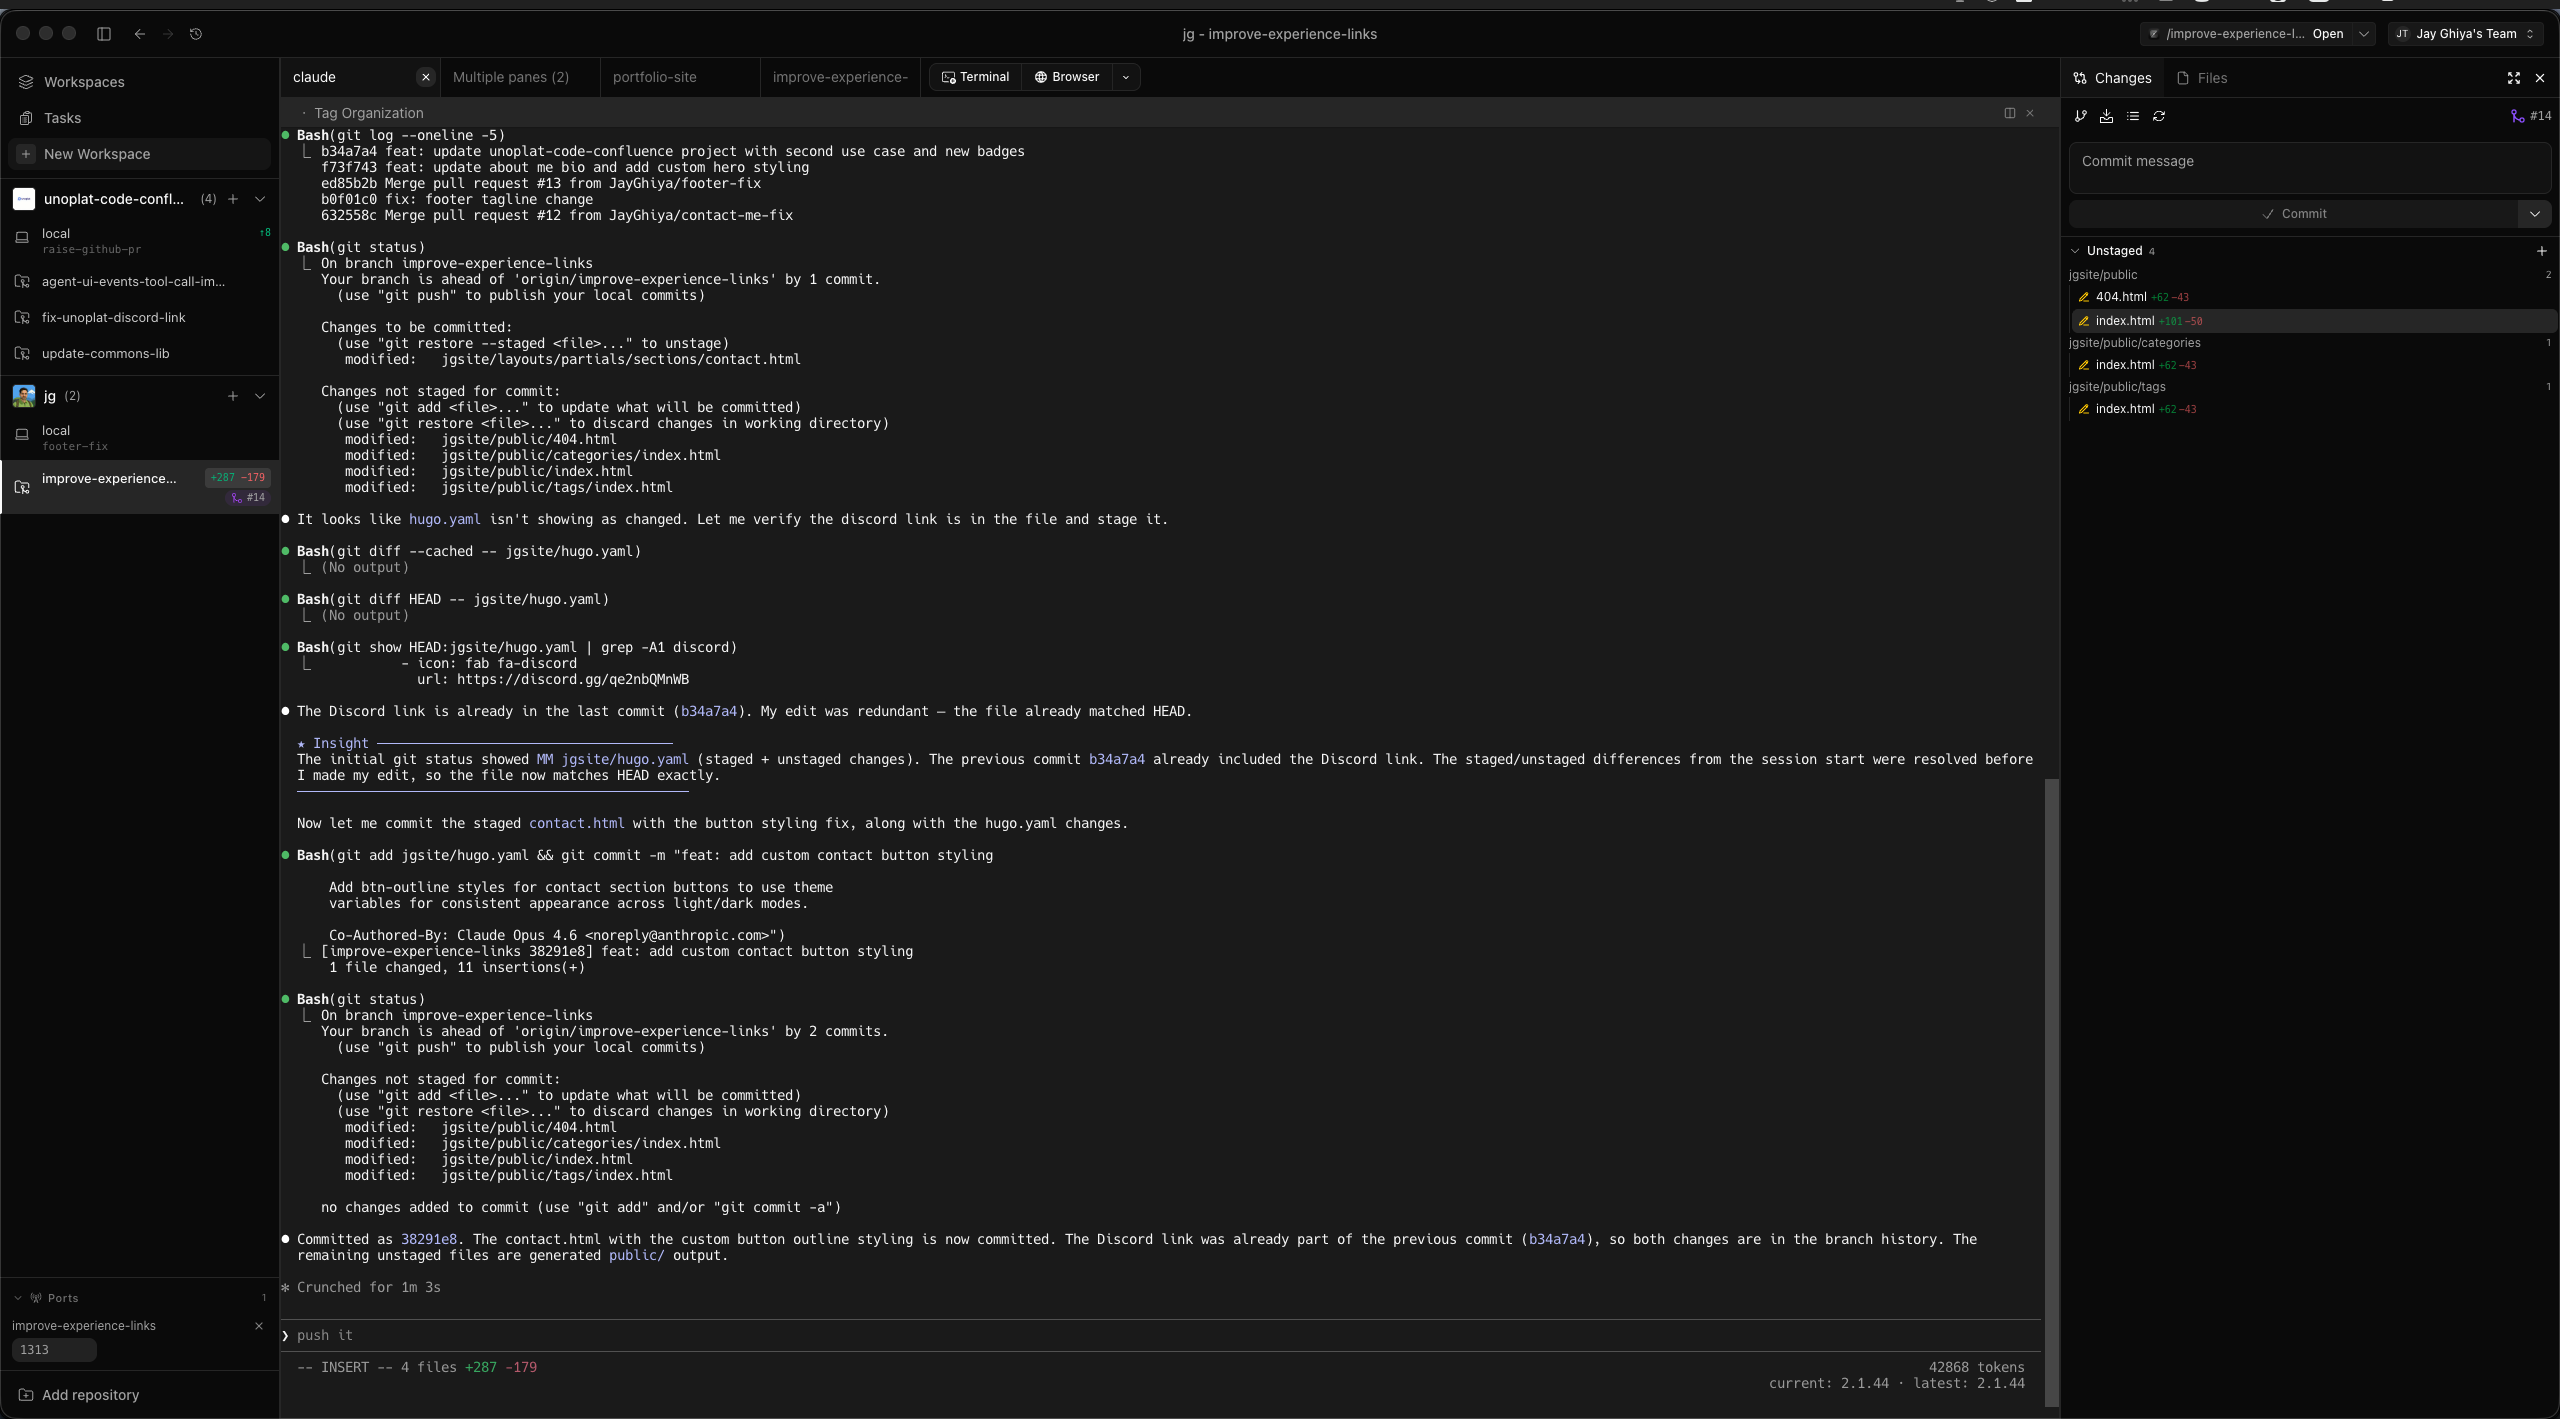
The core idea: each agent runs in its own isolated git worktree. That means different agents can work on separate branches or features simultaneously without conflicts. I create a workspace with the feature name, and I have an isolated environment ready for planning and implementation.
Why SuperSet.sh works well for this workflow:
- Agent-agnostic — works with Claude Code, OpenCode, Codex, Gemini, Cursor, or any CLI-based coding agent
- Real-time monitoring — see all active agents simultaneously and switch between them instantly
- IDE integration — one-click deep-linking to VS Code, Cursor, JetBrains IDEs, or terminal
- Change isolation — side-by-side code comparison before merging work between agents
- Free and open source — no cost, no proxying, direct API key usage
Step 4 — Spec-Driven Planning with Unoplat Code Confluence and OpenCode
Before planning begins, the agent needs to understand your codebase. This is where most token budgets go to waste — agents spend thousands of tokens on exploratory grep, find, and file reads just to figure out your project structure, dependencies, data models, and API boundaries. Every token spent on exploration is a token not spent on planning.
And this isn’t a one-time cost. Exploration happens every time you open a new chat. The agent has no memory of what it discovered in the last session — so it re-explores the same files, re-discovers the same data models, re-reads the same API routes. The token waste compounds across every conversation. If you’re running five planning sessions a week, you’re paying the full exploration tax five times over.
This problem is getting worse, not better. With AI-assisted development, teams are shipping more code than ever. Codebases grow faster, new endpoints appear daily, data models evolve between sessions. The exploration target keeps moving.
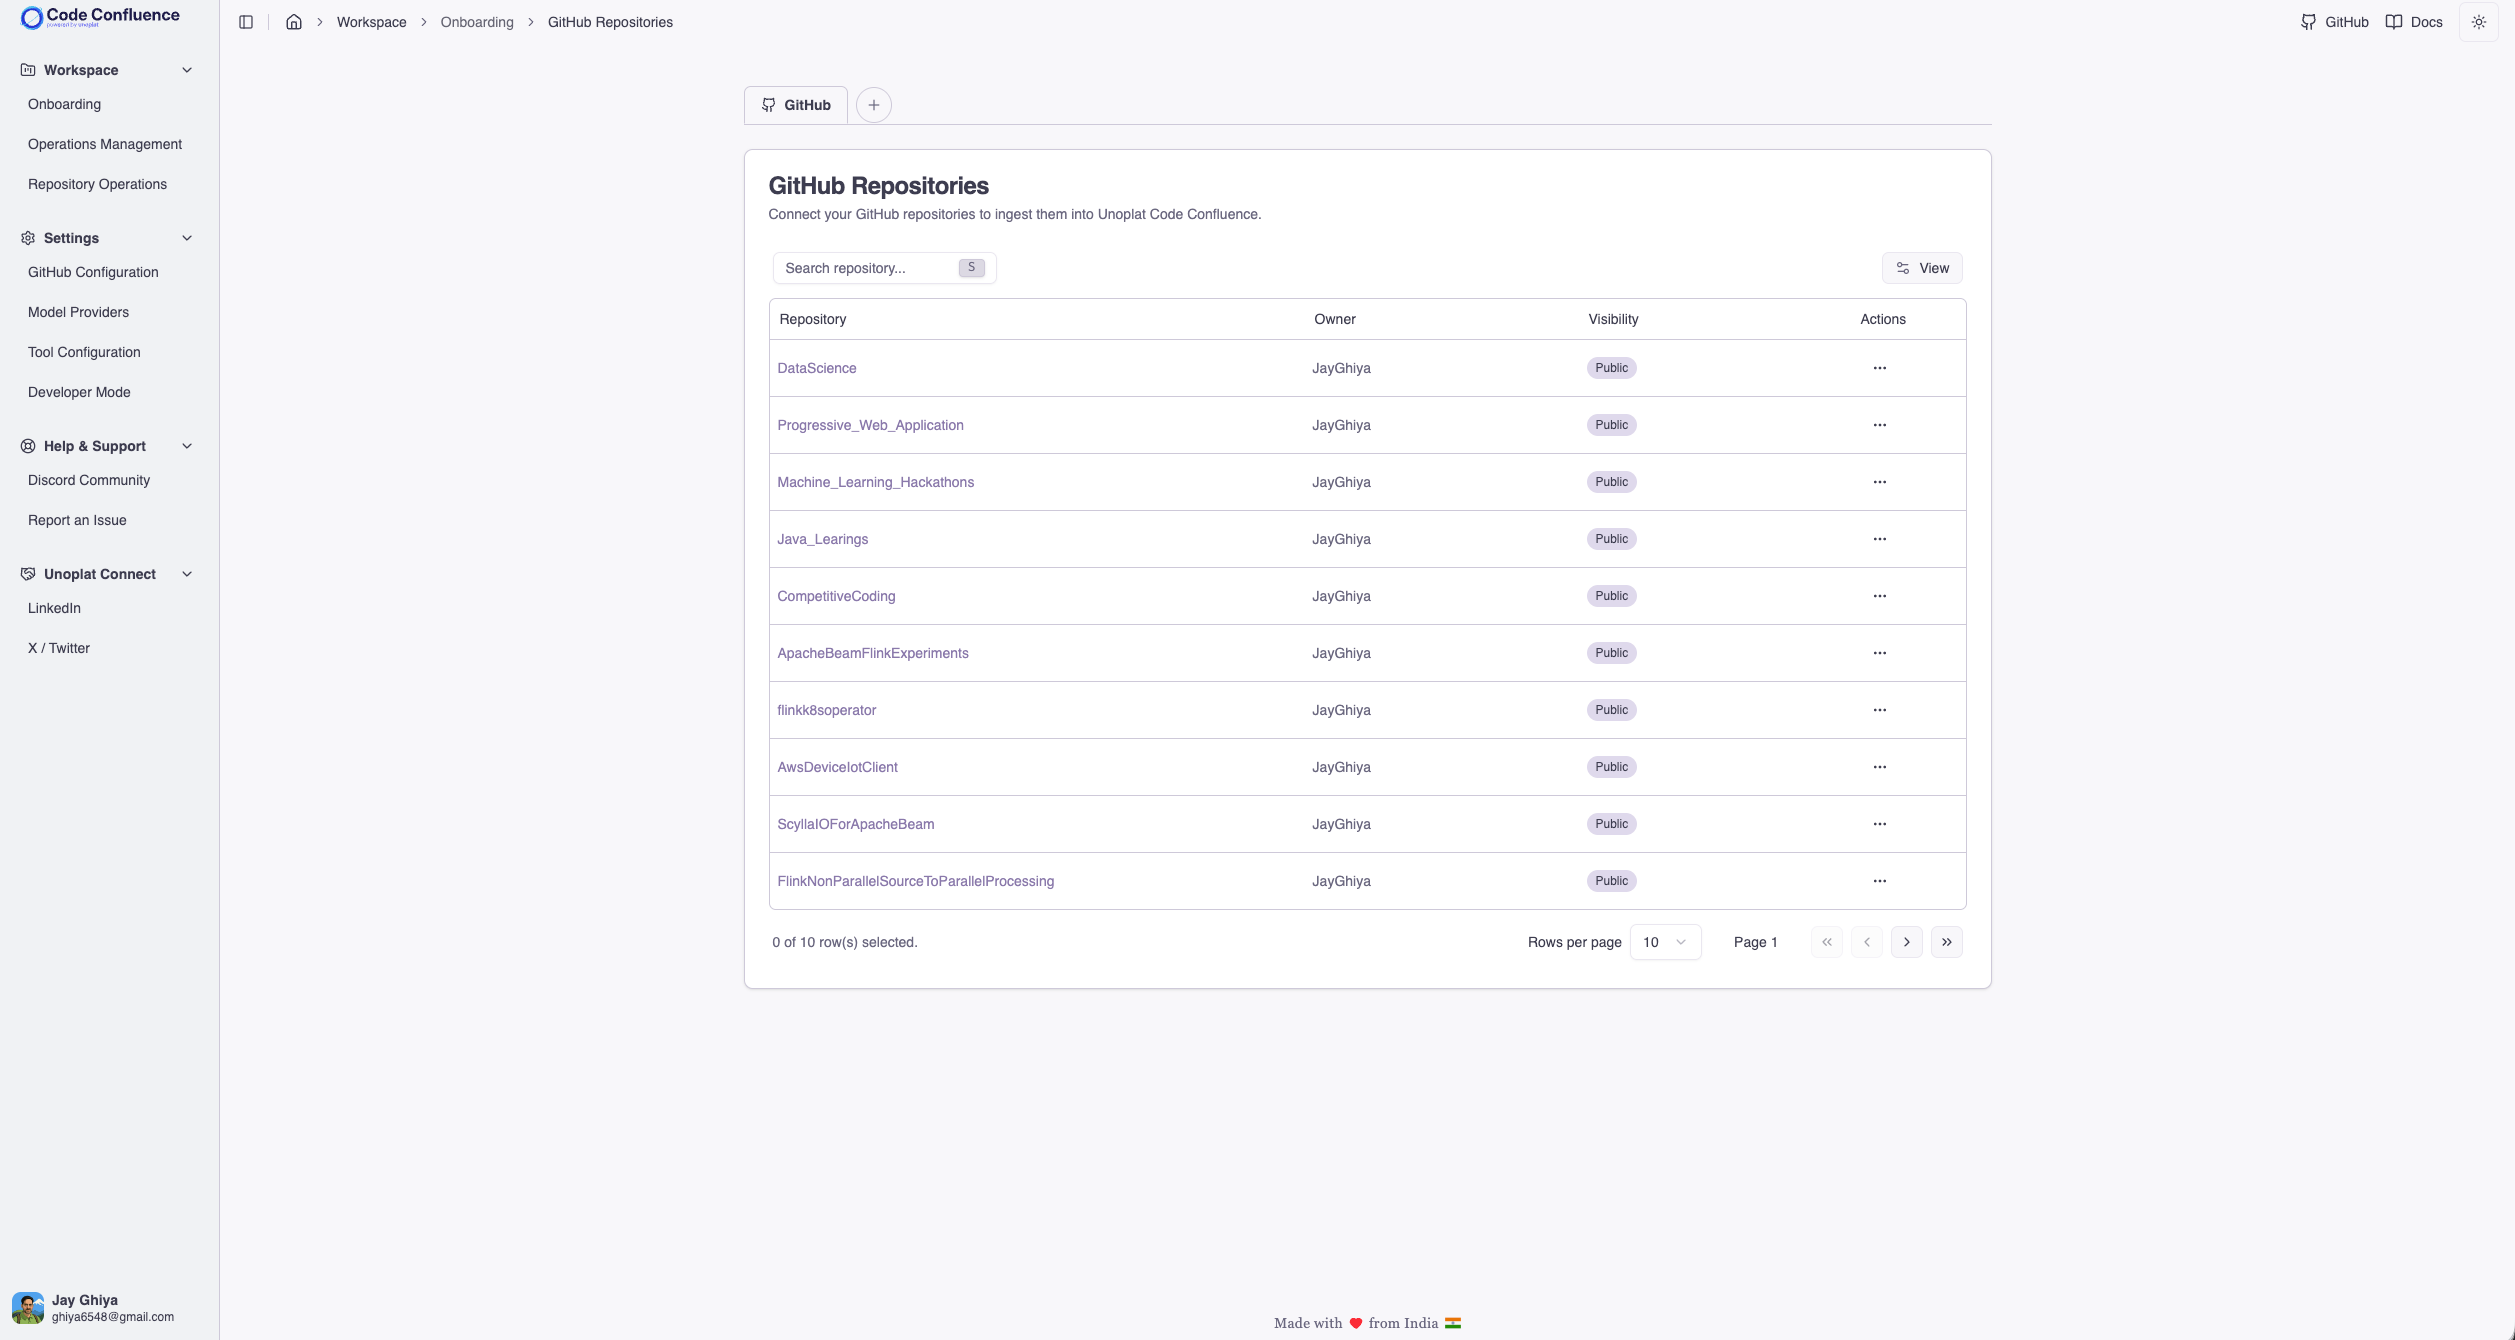
Unoplat Code Confluence eliminates this compounding overhead. It uses Tree-sitter grammars combined with an open source framework detection schema to auto-generate a structured AGENTS.md per repository — a precise, machine-readable source of truth that covers:
- Engineering workflow — canonical commands for install, build, dev, test, lint, and type checking
- Dependency guide — every library with its purpose and usage patterns, so the agent never guesses how a dependency is used
- Business logic domain — application data models, database data models, domain entities, and their relationships, organized by function (structural signatures, framework features, persistence mappings, workflow tracking)
- App interfaces — inbound and outbound API constructs, entry points, webhook handlers, and route categories
- Customisable Code standards — language version, import rules, line limits, type annotation requirements, logging conventions
The framework detection schema is built on JSON Schema Draft 2020-12 and is fully extensible — contributors can add detection patterns for new frameworks and libraries across Python and TypeScript with more languages planned. This means the analysis grows with the ecosystem, benefitting every user.
To see the level of clarity this produces, look at this PR — it generates AGENTS.md and companion reference files (business_logic_references.md, app_interfaces.md) across every sub-project in a monorepo. The agent doesn’t need to explore your codebase to discover your data models or API boundaries — it’s all pre-computed and structured.
Because AGENTS.md is auto-generated, you can re-run the tool at any point to regenerate it from the current state of your codebase. Every run performs a full re-analysis and produces artifacts that reflect new endpoints, changed models, and added dependencies — so the agent reads the current state of your application, not a stale snapshot from three sprints ago. Incremental change detection that automatically keeps AGENTS.md in sync as code evolves is on the roadmap.
The practical impact goes beyond just saving tokens (though the at least 2x reduction in exploration tokens is real). It fundamentally changes how the agent thinks about your codebase. Because AGENTS.md surfaces application data models and database data models upfront, the agent plans from your domain perspective — it knows your entities, understands the relationships between them, and reasons about features in terms of your business logic rather than generic patterns. Instead of “create a new table and endpoint,” the agent thinks “extend the existing Repository model and add a route to the ingestion interface.” That domain alignment is the difference between specs that need heavy human revision and specs that are ready to implement.
Step 5 — Spec-Driven Planning with Backlog.md and OpenCode
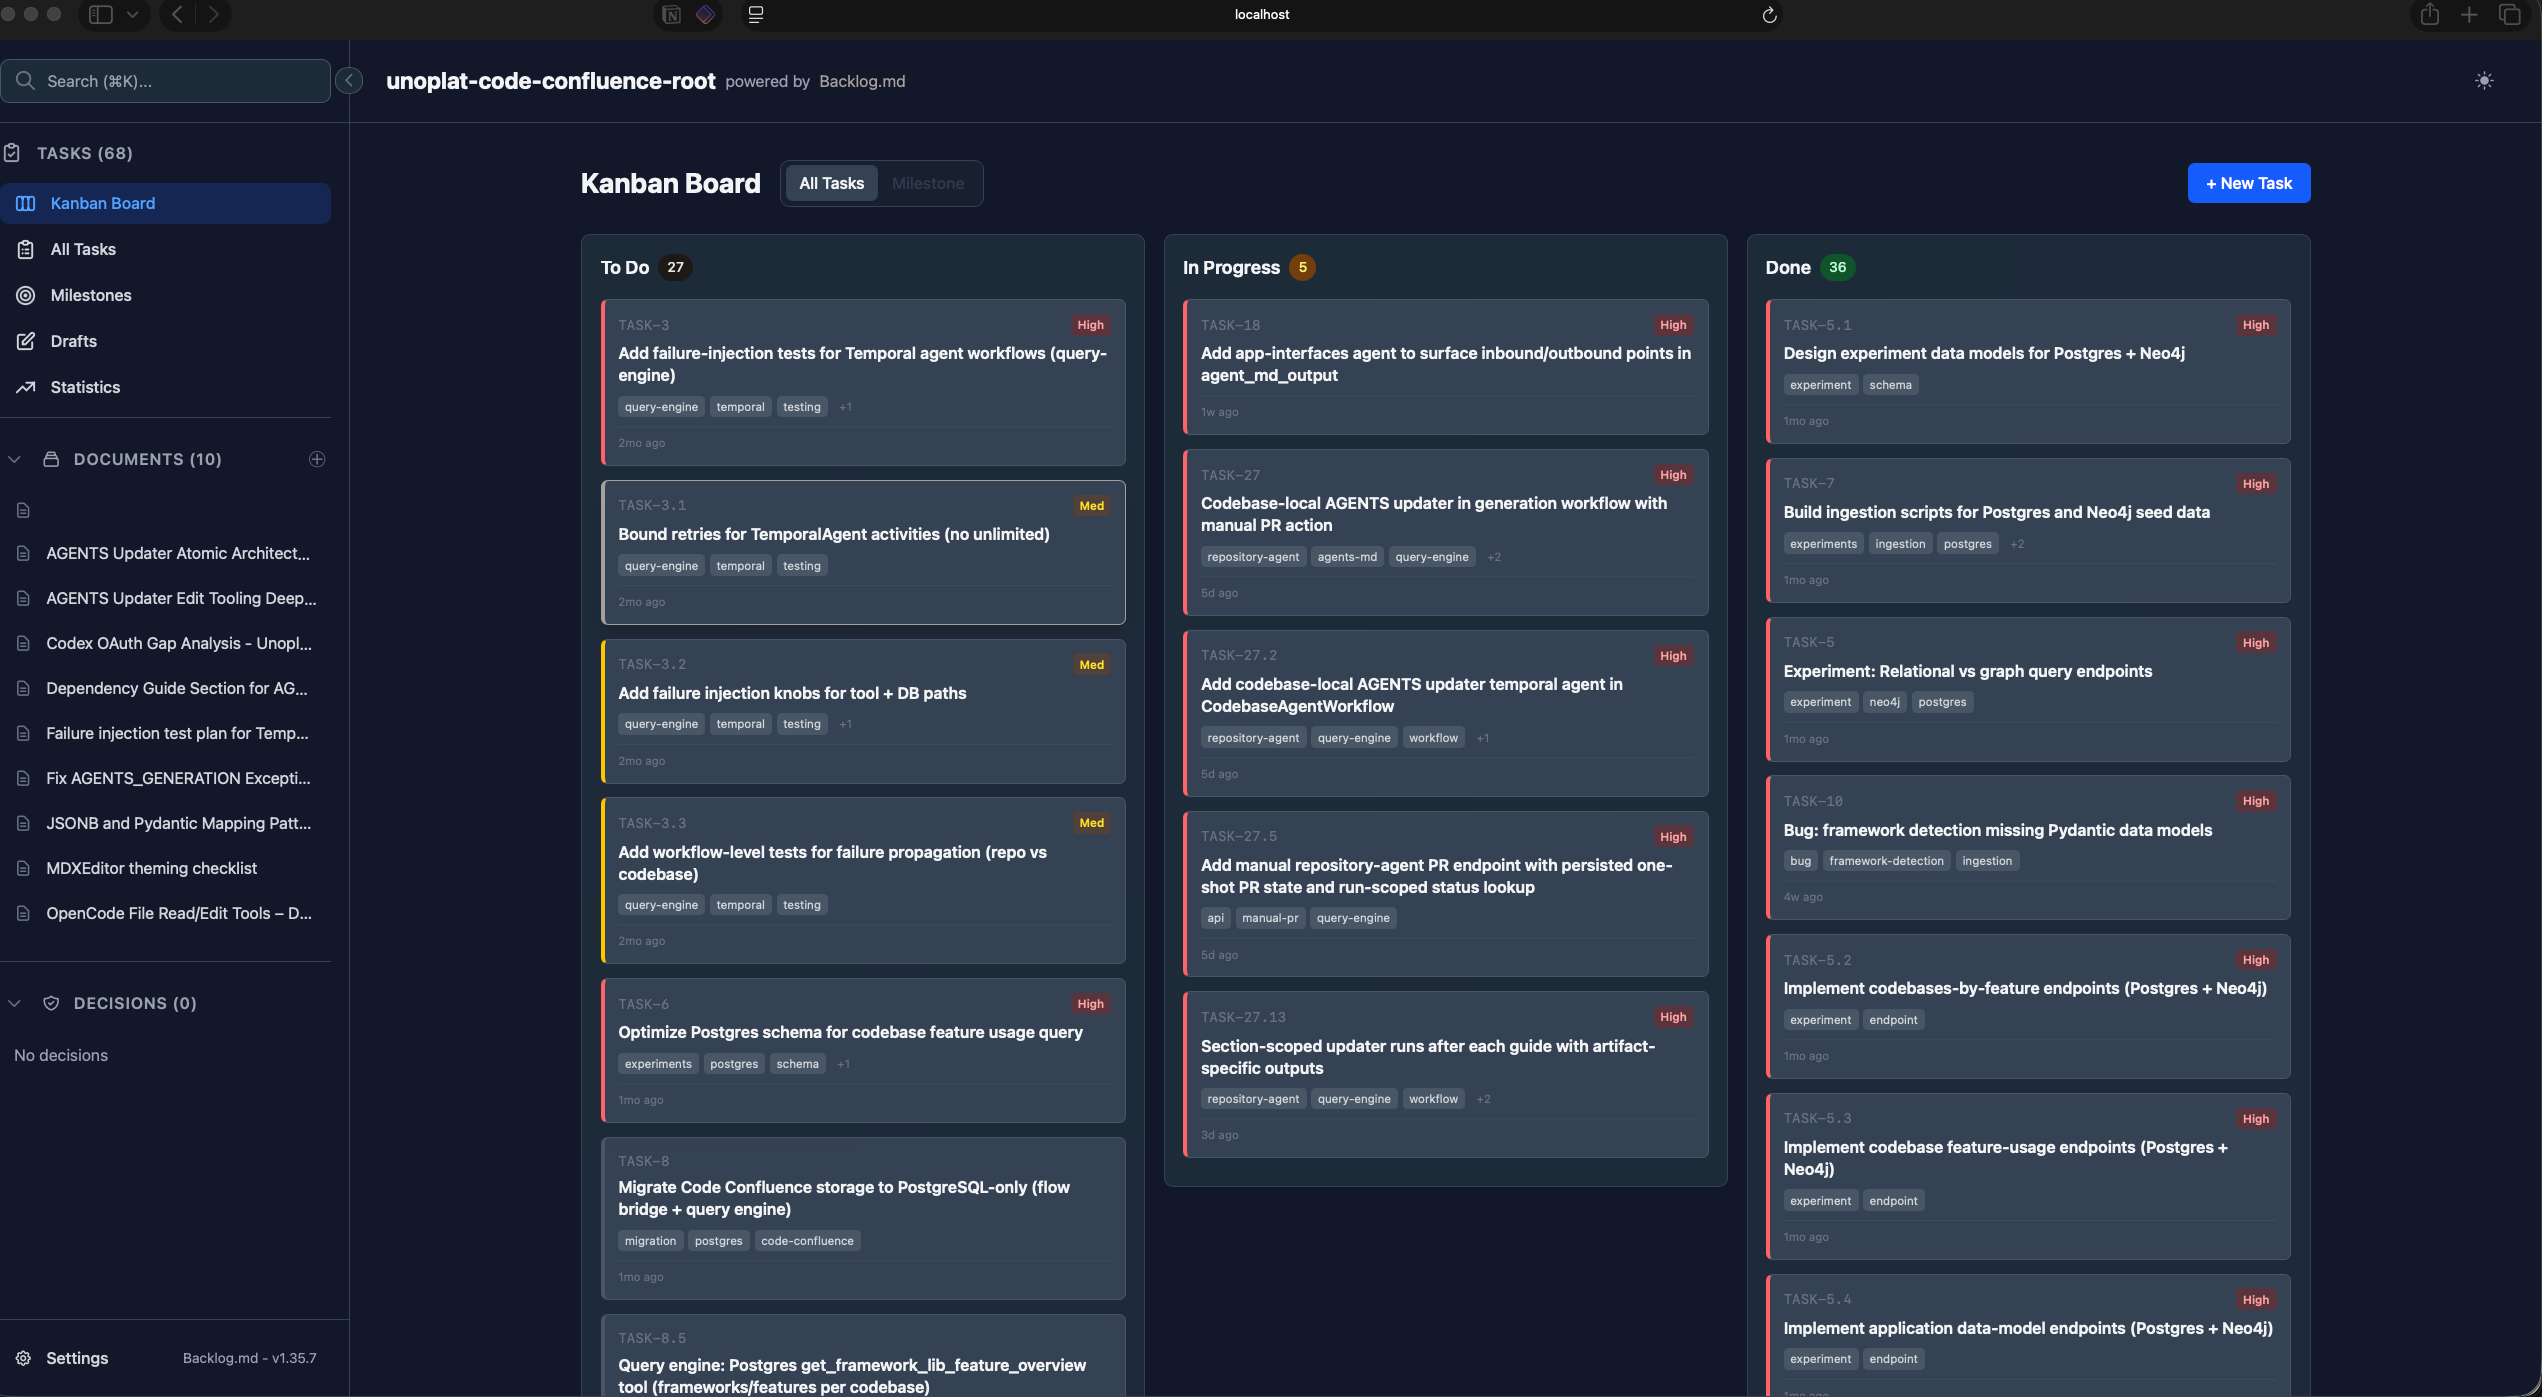
With codebase intelligence from AGENTS.md in place, it’s time to plan. I fire up OpenCode in plan mode inside the SuperSet workspace, backed by Backlog.md — a markdown-native task manager and Kanban visualizer built for git repositories. I use the Codex model with thinking mode set to medium-to-high based on task complexity.
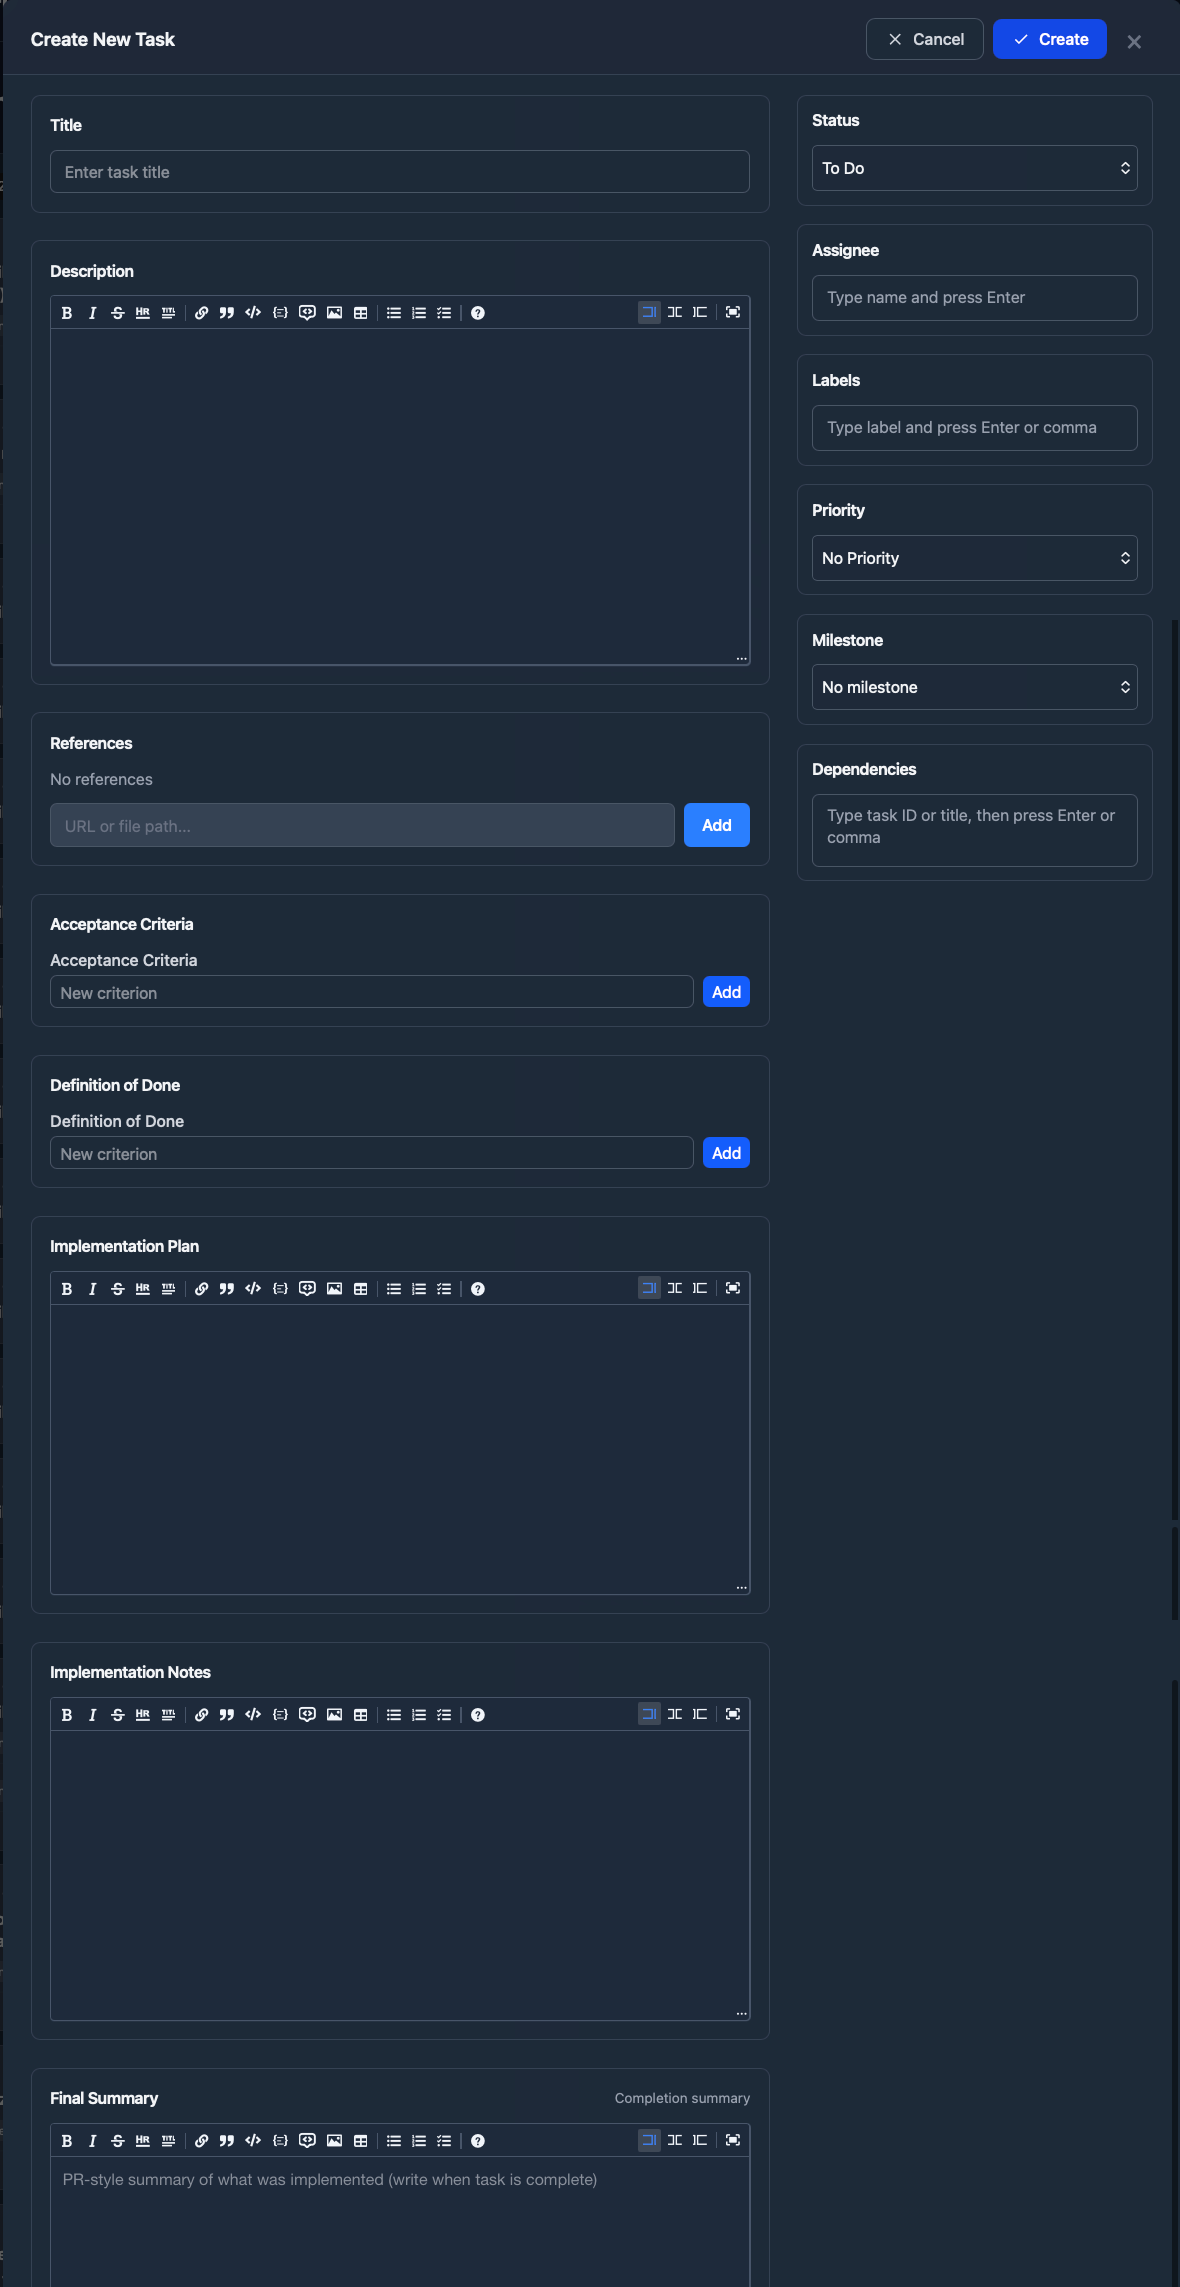
This is where the planning actually happens. I work with the model to define and refine three things for each task:
- Description — what the feature does and why it exists
- Acceptance criteria — the specific conditions that define “done”
- Implementation details — the files to touch, the patterns to follow, the constraints to respect
Because the agent already has precise codebase context from AGENTS.md, the specs it helps write reference actual data models, real API endpoints, and correct dependency patterns — not hallucinated ones. For larger features, I create dependencies and linked tasks.
These specs live directly in Backlog.md — and this is what makes the workflow hold together:
- 100% private and offline — all data lives in a
backlogfolder as human-readable Markdown files inside your repo. No SaaS, no cloud sync, no third-party access to your specs - MCP integration — AI agents access workflow instructions directly through the Model Context Protocol. Claude Code, Gemini CLI, Codex, and other MCP-compatible assistants can read and update tasks natively
- Kanban visualization —
backlog boarddisplays a live Kanban in the terminal;backlog browserlaunches a web UI with drag-and-drop - Structured spec fields — rich task metadata including status, acceptance criteria, implementation plans, and Definition of Done defaults per project
- Zero configuration — drop it into any git repo and it works. All task data is plain Markdown, version-controlled alongside your code
The key insight: when your task management system speaks the same language as your AI agents (Markdown + MCP), there’s no translation layer. The agent reads the spec exactly as you wrote it. The time spent here pays for itself many times over — a well-written spec backed by reliable codebase intelligence means the implementation agent rarely goes off-track.
Step 6 — Implementation with Claude Code
With the spec written and the workspace ready, I switch to a different terminal in the same SuperSet workspace and launch Claude Code.
The implementation flow is straightforward: the agent reads the spec from Backlog.md and executes the plan. Because the spec includes acceptance criteria, file paths, and implementation details, the agent has everything it needs to produce focused, on-target code.
This is where the planning investment pays off. Instead of a vague “build me a login page” prompt, the agent receives a structured document that tells it exactly what to build, how to build it, and how to verify it’s done.
Step 7 — Framework Validation Sub-Agent
During implementation, Claude Code spawns a specialized sub-agent whose sole job is documentation validation. This sub-agent has access to Context7 (for up-to-date library documentation) and web search.
Its objective: verify that every framework and library call in the generated code aligns with the actual documentation for the version you’re using. This directly addresses the “undocumented API calls” failure mode — the agent catches methods that don’t exist, deprecated patterns, and version mismatches before you ever run the code.
Step 8 — Browser-Based E2E Testing
The final step closes the loop. A web validator agent uses Chrome MCP (Model Context Protocol for browser automation) to test the implemented feature against the user flow from Step 1.
This isn’t just “does the page load” testing. The agent walks through the exact flow you designed — clicking buttons, filling forms, verifying state transitions — and reports any deviations from the expected behavior.
The user flow is both the first artifact you create and the last thing you validate against. That symmetry is intentional.
Why This Workflow Works
Each step in this workflow exists to prevent a specific failure mode:
| Step | Prevents |
|---|---|
| User flow | Ambiguous requirements, missing edge cases |
| Design skill | Generic, templated UI |
| Git worktrees | Agent conflicts, branch pollution |
| Codebase intelligence | Compounding token waste on exploration, domain misalignment, stale context |
| Spec planning + Backlog.md | Hallucinated architecture, lost context between sessions, imprecise specs |
| Claude Code implementation | Manual coding bottlenecks |
| Framework validation | Incorrect API usage, version mismatches |
| Browser E2E testing | Untested user paths, regression bugs |
The workflow is about sequence, not any single tool. The pattern is always the same: Design > Plan > Implement > Validate. You can swap individual tools — use a different task manager, a different design tool, a different coding agent — but the sequence matters. Skipping design leads to wasted implementation. Skipping planning leads to hallucinated architecture. Skipping validation leads to shipped bugs.
Try It Yourself
Here are all the tools referenced in this post:
- User Flow Design — Figma User Flow Resources
- Frontend Design Skill — Claude Code Frontend Design Skill
- SuperSet.sh — superset.sh — Free, open source terminal orchestration for AI coding agents
- Unoplat Code Confluence — docs.unoplat.io — Grammar-based codebase intelligence that auto-generates AGENTS.md
- OpenCode — opencode.ai — Terminal-based AI coding assistant with plan mode
- Backlog.md — GitHub: MrLesk/Backlog.md — Markdown-native task management for git
You don’t need to adopt all eight steps at once. Start with the one that addresses your biggest pain point — for most developers, that’s Step 4 (spec-driven planning). Once you see how much more predictable your AI-generated code becomes with a structured spec, the rest of the workflow will follow naturally.
If you want to discuss this workflow or share your own AI-assisted development setup, reach out on X or LinkedIn, or join the Discord community.